How to Install the Reolink Solar Floodlight Cam

Why you can trust SafeWise
products considered
250+
research hours in 25+ in-home tests
10k+
years of combined experience
176+
homes and people protected
10M+

For over 13 years, SafeWise experts have conducted independent research and testing to write unbiased, human reviews (not robots). Learn more.

Alina Bradford
Mar 19, 2026
Icon Time To Read6 min read
Icon CheckReviewed ByRebecca Edwards

With 25+ years in tech journalism, Alina blends safety expertise with her passion for simplifying technology. Alina has tested hundreds of safety and security devices, is trained as a first responder, and has worked as a volunteer firefighter.

Installing a solar-powered security camera sounds like one of those “quick weekend projects” that somehow eats your entire Saturday. The good news is the Reolink Solar Floodlight Cam is actually pretty manageable, as long as you follow the steps in the right order and do not skip ahead like a rebel.

This guide walks you through setting up your Reolink solar floodlight camera, from charging and app setup to mounting and final adjustments. Don’t do what I did! Do all these steps in the proper order. My first time, I forgot to charge the camera and set it up in the app, and had to take the whole thing down and restart.


Video: How to install the Reolink Solar Floodlight Cam

Play Video

Subscribe to our YouTube channel and learn how to protect your home, loved ones and, belongings.


Stay Safe and become a SafeWise Insider!

Sign up for our free weekly newsletter to get the best safety news, product info, and deals.

By signing up, you agree to our Terms and Conditions and Privacy Policy.

Reolink Solar Floodlight Cam surrounded by what comes in the box.

Everything you need to get started with the Reolink Solar Floodlight Cam. Image: Alina Bradford. SafeWise

What you need before you start

Before you even think about climbing a ladder or opening the app, get your setup in order.

You’ll need:

  • Reolink Solar Floodlight Camera
  • A drill and screwdriver (or screw bit)
  • The included mounting hardware
  • A microSD card (if you don't have a Reolink hub)
  • The included mounting template
  • A ladder, if installing above ground level
Checklist
Get the right screws

If you’re mounting on metal, you’ll also need metal screws. The ones in the box are meant for wood.

Step 1: Charge the camera fully

Start here. Flip the camera over and locate the small rubber covers near the sensor (the round ball-like thing). These protect the ports and buttons. One of them is labeled for USB-C charging.

Open it, plug in your USB-C cable, and charge the camera to 100%.

Skipping this step leads to connection failures later, and then you get to troubleshoot for 20 minutes before realizing the battery was the problem all along (oops!). Save yourself the drama.

Step 2: Set up the camera in the app

Once the camera is charged, it’s time to get it connected. Install the Reolink app on your phone. Open it, and tap the plus icon in the top-right corner to add a new device.

Once installed:

  1. Open the app.
  2. Tap the plus (+) icon in the upper-right corner.
  3. Scan the QR code on the back of the camera, near the mount.

Now, you’ll decide how your camera stores footage:

  • Option 1: Using your camera with a Reolink hub. If you already have a Reolink Home Hub, select this option. It allows centralized storage for your camera footage.
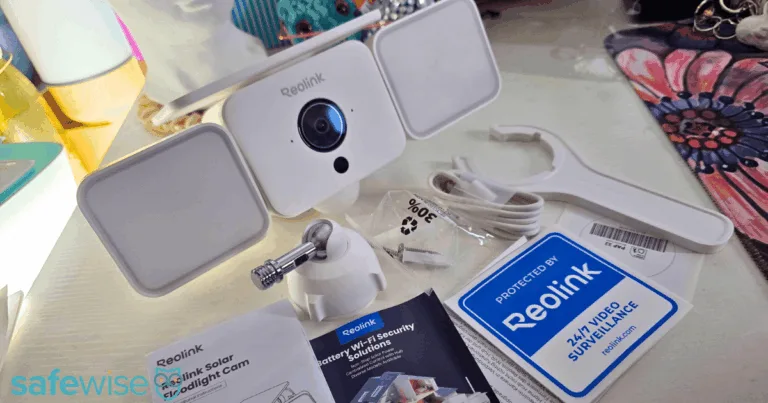
  • Option 2: Using your camera in Standalone Mode (not using a hub). If you’re not using a hub, you’ll need to insert a microSD card into the camera for local storage. The slot for the microSD card is located under the second rubber cover by the sensor, along with the power button.

Pick your setup, confirm your selection, and move forward.

Time to interact with the world’s tiniest button. Open the second compartment near the sensor. Inside, you will find the power button and the microSD card slot.

To prep the device, press the power button three times quickly. Then, in the app, confirm the indicator light is flashing red and tap Next. This step syncs the camera with the setup process, so do not rush it. 

Next, you'll connect the camera to your network. Choose your Wi-Fi band (2.4GHz or 5GHz, pick whatever your router uses) and tap Next. The app will then display a QR code on your phone screen.

Hold your camera up to your phone so it can scan that code. Yes, your camera is now scanning your phone. Technology has come full circle.

Once you hear a beep, tap I heard a beep. Then, tap Next. When the app confirms the connection to your router, tap Next again. Then wait. And wait a little more. This part can take a minute, so resist the urge to start tapping things randomly. Mine took about five minutes.

Once connected:

  1. Tap Next to begin installation.
  2. Wait for the system to finalize setup.
  3. Name your device (pick something logical, not “Camera 1” unless you enjoy confusion later).

The app will then show you some placement tips. Pay attention to these, because they actually matter.

Avoid pointing your camera at:

  • Moving objects like trees or busy streets
  • Strong direct light
  • Heat sources
  • Mirrors or reflective surfaces

All of those can trigger false alerts or reduce image quality.

Finally, take a screenshot of the QR code shown in the app. This can help with future setup or troubleshooting.

Tap Finish to complete your app setup.

Step 3: Prepare the mounting hardware

Now for the part where tools come out, and confidence gets tested. Take the mount and separate the base from the adjustable arm by unscrewing it.

The box includes a mounting template. Use it. Eyeballing screw placement is how you end up with a massive headache and the urge to throw your new camera.

Step 4: Drill and install the base

Choose your installation location. A common spot is above a garage or carport.

  1. Remove the paper backing from the template sticker.
  2. Place the template on the wall.
  3. Mark or drill holes where indicated on the sticker.


Now, depending on your surface:

  • Wood: Use the included screws in the packet.
  • Metal: Use metal screws (not included, because that would be too convenient).

Drill the holes, then secure the base plate to the surface. Make sure it is tight and stable. A loose base will make your camera jiggle whenever the wind blows, which will make your footage shaky. 

Step 5: Attach the mount and camera

Once the base is installed:

  • Attach the adjustable mount to the base by screwing it on. 
  • Then, tighten it using the plastic wrench that’s included in the box.
  • Screw the camera onto the mount. Use the tool to hold the base steady as you screw.

Make sure everything is secure before letting go. Gravity has a strong opinion about poorly installed devices. I know from experience. 

Step 6: Adjust the camera and lights

Once mounted, you can position the camera and floodlights. The lights are flexible and can be angled:

  • Up
  • Down
  • Sideways

Adjust them to cover the area you want illuminated. Then angle the camera to get the best view of your space. Take a minute here. Small adjustments make a big difference in what your camera actually captures.

Step 7: Test your setup

The Reolink Solar Floodlight Cam installed on a carport.

The Reolink Solar Floodlight Cam installed and ready to go. Image: Alina Bradford, SafeWise

Before calling it done:

  • Check the live feed in the app
  • Walk through the camera’s view to test motion detection
  • Make sure the lights trigger properly

If something looks off, adjust the angle or reposition slightly.

Placement tips

Mounting location can make or break your setup.

Aim for:

  • A height of about 8 to 10 feet
  • A clear, unobstructed view
  • Strong Wi-Fi signal

Avoid:

  • Direct sunlight into the lens
  • Areas with constant movement
  • Spots too far from your router

Bad placement leads to false alerts, missed activity, and frustration. None of that is fun.

Final thoughts

Now your camera is installed, your lights are positioned, and your home is a little harder to mess with. Not bad for a project that mostly involved scanning things and tightening screws.

Installing a solar floodlight camera is mostly a simple process, but it’s one of those projects where small mistakes add up fast. 

Remember, charge first, set up in the app second, mount last. Reverse that, and you will be climbing up and down a ladder questioning your life choices, like I did.

FAQ

My Reolink Solar Floodlight Cam came with its battery at 50%. It took about an hour to fully charge.

When I followed the directions, it only took about 30 minutes. 

No, you can put it in a spot that doesn't get full sun, and it will stay fully charged. Don't put it in a very shady spot, though.

Related articles on SafeWise


Disclaimers

*Product prices and availability are accurate as of the date/time indicated and are subject to change. Any price and availability information displayed on Amazon at the time of purchase will apply to the purchase of this product. Safewise.com utilizes paid Amazon links.

Certain content that appears on this site comes from Amazon. This content is provided “as is” and is subject to change or removal at any time.

Alina Bradford
Written by
Alina is a safety and security expert with over 25 years of experience. She has contributed her insights to CNET, CBS, Digital Trends, MTV, Top Ten Reviews, and many others. After testing thousands of devices, apps, services, and more, her goal is to make safety and security gadgets less mystifying one article at a time. In the early 2000s, Alina worked as a volunteer firefighter, earning her first responder certification and paving the way to her current career. Plus, she has tested hundreds of pieces of security and safety equipment over the years. Places published: CBS, MTV, CVS, Rachael Ray, eBay, Reader’s Digest, ConsumerAffairs, and more. Certifications: Fire Service Training, Oklahoma State University. Awards: Received the Experience Leader certificate from Authority, putting her “in the top 25% among the thousands of professional content creators analyzed by Authory for the Fall 2023 audit.” You can view more of Alina's work at alinabradford.com.

Recent Articles

Reolink Solar Floodlight Cam surrounded by what comes in the box.
How to Install the Reolink Solar Floodlight Cam
Here's how to install the Reolink Solar Floodlight Cam, from how to charge it, to...
ADT security sign closeup
Alternatives to ADT Home Security Systems (2026)
Not sure ADT is right for you? Discover the best home security systems with flexible...
home with ADT sign
How to Cancel ADT (2026): Phone Number, Fees & Step-by-Step Guide
Learn exactly how to cancel ADT, including the customer service number, cancelation fees, and steps...
Best Weatherproof Security Cameras
Lorex is our top weatherproof security camera to watch over your yard in various conditions....